Looking for a simple way to install Gratis Red Addon on Kodi without setting up Real-Debrid, AllDebrid, Premiumize, or any other paid Debrid service? You are in the right place.
In this guide, we will walk through the full installation process in a friendly, beginner safe way. Whether you are using Kodi on a Firestick, Android TV, Google TV box, Windows PC, Mac, or another Kodi-supported device, the steps are almost the same.
Gratis Red is a third-party Kodi video addon found in The Red Repo. Recent Kodi guides describe it as an updated version of Gratis and a clone/fork style addon based around the familiar Scrubs V2 layout, with non-Debrid links for movies and TV shows.
Before we begin, here is the important part: only use Kodi addons to access content you have the legal right to watch. Third party addons are not verified by Kodi, and the end user is responsible for what they access. Kodi’s own documentation also warns that enabling Unknown Sources gives addons access to personal data stored on your device.
With that out of the way lets get into the setup.
What Is Gratis Red Addon?
Gratis Red is a non-Debrid Kodi addon designed for people who want a lightweight movie and TV addon without connecting a premium resolver account. In simple words, you do not need Real-Debrid, Premiumize, AllDebrid, or TorBox just to open the addon and browse its sections.
That makes it attractive for casual Kodi users who do not want to pay for an extra service or deal with API keys, pairing screens, authorization codes, or account linking. You install the addon, open it from Kodi’s Addons menu, and browse the available categories.
According to current installation guides, Gratis Red is located inside The Red Repo, and the repo source currently being listed is https://repo.redwizard.xyz.
The addon usually includes simple categories such as Movies, TV Shows, My Stuff, and Tools. Some guides also mention Trakt support, which can be useful if you like tracking watch history across multiple devices.
What Does Non-Debrid Mean?
If you are new to Kodi, the word Debrid can sound more complicated than it really is.
A Debrid service is a paid link-resolving service that many Kodi users connect to certain addons for faster, higher-quality, and more reliable links. Real-Debrid is probably the most well-known example. These services are popular because free links can be slow, broken, low quality, or full of buffering.
A non-Debrid addon, on the other hand, is an addon that can work without requiring one of those paid services.
That does not mean every link will work perfectly. In fact, free non-Debrid links are usually less reliable than premium Debrid links. You may see buffering, dead links, missing sources, or lower video quality. But for users who just want a free, simple Kodi setup, non-Debrid addons are often easier to understand.
Gratis Red fits into that category.
Is Gratis Red an Official Kodi Addon?
No. Gratis Red is a third-party Kodi addon. That means it is not part of the official Kodi repository, and it is not supported by the Kodi team.
This matters because official Kodi support channels usually do not help troubleshoot third-party addons. If something breaks, disappears, or fails to install, you need to check the addon developer’s repo, community posts, or updated installation guides instead.
Also, because it is third-party software, you should be careful. Install addons only from sources you trust, scan repository URLs where possible, and avoid entering personal information inside unknown addons.
Before You Install Gratis Red
Before installing Gratis Red on Kodi, make sure you have:
- A working Kodi installation
- A stable internet connection
- Unknown Sources enabled in Kodi
- The current Red Repo URL
- A device with enough storage space
These steps should work on most Kodi devices, including Firestick, Fire TV, Android TV, Google TV, Windows, macOS, Linux, and Android phones or tablets.
The menu names can look slightly different depending on your Kodi version, skin, or device, but the basic path is the same.
Step 1: Open Kodi Settings
Start on your Kodi home screen.
Look for the small gear icon in the top left corner. That is the Settings menu. Click it.
From here, you can access system settings, file manager, interface options, profiles, services, and addon settings.
For this installation, we mainly need two areas:
System and File Manager.
Step 2: Enable Unknown Sources
Because Gratis Red is not in Kodi’s official repository, you need to allow Kodi to install addons from outside sources.
Go to:
Settings > System > Add-ons
Now find Unknown sources and turn it on.
Kodi may show a warning message. Read it carefully. The official Kodi documentation explains that enabling Unknown Sources allows addons to access personal data stored on your device, and you are responsible for any unwanted behavior or damage.
Click Yes only if you understand the risk and still want to continue.
A smart extra step is to change automatic updates to a safer setting. Under the same Addons settings area, set updates to something like Notify, but dont install updates automatically if your Kodi version offers that option. This gives you more control over third party addon updates.
Step 3: Add The Red Repo Source
Now go back to the Kodi Settings screen and select:
File Manager
Then choose:
Add source
A box will appear. Click where it says:
None
Now type the repo URL exactly like this:
Double check the spelling. A single wrong letter, missing slash, or extra space can cause the installation to fail.
Under the source name field, enter a simple name such as:
red
You can use another name if you want, but red is short and easy to recognize later.
Click OK to save the source.
Step 4: Open the Add-ons Menu
Now return to the main Kodi home screen.
Click:
Add-ons
Depending on your Kodi layout, you may see an open-box icon, sometimes called the package installer icon. This is where Kodi lets you install addons from ZIP files or repositories.
Select:
Install from zip file
If Kodi shows another warning about ZIP installs, read it and continue only if you are comfortable.
Kodis official guide explains that Install from zip file is used when installing addons or repositories that are not available in the official Kodi repository.
Step 5: Install The Red Repo ZIP
After clicking Install from zip file, Kodi will show the sources you have added.
Choose the source name you created earlier:
red
Now look for the repository ZIP file. It may appear as something like:
repository.redwizard.zip
or:
repository.redwizard.x.x.x.zip
The exact version number can change over time.
Click the ZIP file and wait for the notification that says the repository has been installed. This message usually appears in the top-right corner of the screen.
Do not rush this part. If your internet connection is slow, give Kodi a little time.
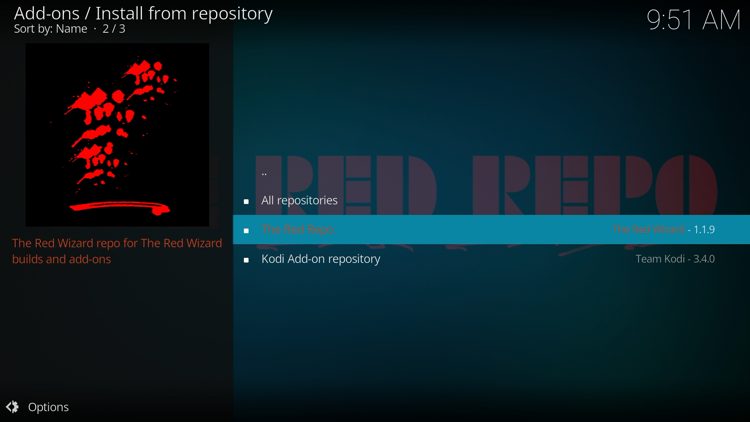
Step 6: Install Gratis Red from The Red Repo
Once the repo is installed, stay in the Add-ons area and select:
Install from repository
Kodis official add-on manager guide describes this as the normal process for installing an addon after a repository has been added: choose the repository, choose the addon category, choose the addon, then select Install.
Now select:
The Red Repo
Then choose:
Video add-ons
Find:
Gratis Red
Click it, then press:
Install
Kodi may show a list of dependencies that need to be installed with the addon. Click OK if you want to continue.
Wait until you see the message:
Gratis Red Add-on installed
That means the installation is complete.
Step 7: Open Gratis Red on Kodi
To open the addon, return to your Kodi home screen and go to:
Add-ons > Video add-ons > Gratis Red
Click the addon icon.
You should now see the main Gratis Red menu. Depending on the current version, the sections may include Movies, TV Shows, My Stuff, Tools, Search, or similar categories.
Take a few minutes to explore the layout. If you have used Scrubs V2-style addons before, the menu may feel familiar.
How to Use Gratis Red Safely
Gratis Red is easy to install, but safe usage matters.
First, remember that third-party Kodi addons are not verified by Kodi. That does not automatically mean they are unsafe, but it does mean you should be more careful than you would be with official repository addons.
Second, only access content that is legal in your region and that you have permission to watch. A Kodi addon can be just a tool, but how you use it matters.
Third, avoid typing personal information into unknown addon menus. If an addon asks for strange login details, payment information, or device permissions that do not make sense, stop and research before continuing.
Fourth, keep Kodi updated. Older Kodi versions can create compatibility issues and security problems. If Gratis Red does not install correctly, your Kodi version may be outdated.
Finally, remove addons you no longer use. A cleaner Kodi setup is easier to troubleshoot and usually runs better.
Gratis Red Not Working? Try These Fixes
If Gratis Red does not work after installation, do not panic. Kodi addons can fail for simple reasons.
Start by checking your internet connection. If your device is offline or your Wi-Fi is weak, the addon may not load sources properly.
Next, confirm that the repo URL was typed correctly:
If the URL is wrong delete the source and add it again.
If the addon installs but does not open, restart Kodi. On Firestick or Android TV, you can also force-close Kodi from the device settings and reopen it.
If sources fail to play, try another title or another link. Non-Debrid links are often inconsistent, so one broken source does not always mean the whole addon is broken.
You can also clear cache from the addon’s Tools menu if that option is available. Cache buildup can sometimes cause slow menus, failed scraping, or playback errors.
If nothing works, the repository may be temporarily down, the addon may have changed, or the current version may have a bug.
Common Installation Errors
One common error is Could not connect to repository.This usually means the repo URL is wrong, the server is offline, or your internet connection is blocking access.
Another common issue is Failed to install dependency. This happens when Kodi cannot download one of the extra files the addon needs. Try restarting Kodi, checking the repo again, or updating Kodi to the latest stable version.
If you do not see Install from zip file, check that you are in the Addons package installer area. On some Kodi skins, the menu looks slightly different.
If Unknown Sources is disabled Kodi will stop the ZIP install until you enable it.
Should You Use Gratis Red Without Debrid?
Gratis Red can be a useful choice if you want a simple, no Debrid Kodi addon It is especially appealing for users who do not want to create or pay for a Debrid account.
However, you should keep your expectations realistic. Non Debrid addons often come with trade offs. Free links may buffer, disappear, or play in lower quality. Some links may not work at all.
If you want the smoothest Kodi streaming experience, Debrid-based addons often perform better. But if your goal is to test a free, non Debrid option, Gratis Red is worth exploring carefully.
Final Thoughts
Installing Gratis Red Addon on Kodi is pretty straightforward once you know the steps. You enable Unknown Sources, add The Red Repo source, install the repository ZIP file, and then install Gratis Red from the Video add-ons section.
The key thing is to stay careful. Gratis Red is a third party addon, not an official Kodi addon. Use it responsibly, avoid questionable content, and keep your device protected.
For casual Kodi users who want a non-Debrid setup, Gratis Red offers a simple path without extra accounts or premium services. Just remember that free links can be unpredictable, so patience is part of the experience.
If you follow the steps above, you should be able to install Gratis Red on Kodi and start exploring its menus in just a few minutes.